Home Blog

Too Many Months Gone By

0

It’s been a while since I’ve posted … too long actually. However, let me fill you in on what’s been going on in the last few months.

months gone by

Kids Going Back To School

I know, it’s December, so why am I talking about the kids going back to school? Well, that’s one of the reasons that the blog slowed down. Getting my boys ready for the school year took way more time and energy than I want to admit. In fact, this one single thing – the kids going to school – managed to be an excuse for me to not do several things that I wanted to.

But let’s be honest. I have been intentional about giving the kids the time they deserve from me. So, not a real loss to say that I’ve been giving them more time than I have other things.

Business Kicking In

I started a new business in 2017. Well, I’ve been doing it on the side for almost 2 years, but it officially became my full-time income source in 2017. It really kicked in about the time I wrote my last blog post here. So that’s good news for me. Now that I’m getting into more of a rhythm with the business I can start to add more content here.

[Plug Time] If you are interested in seeing what I’m up to in my business check out the link to my consulting website.

Flying Less Than I Want To

flying in a movie

With life happening all around me some things had to give way. I’ve been blogging here less and I’ve been flying less. Those two things didn’t end up ranking high enough on my attention meter to push anything else down.

And I’m going on year 2 of “working on my instrument rating”. That’s something I need to just set aside a week and study for the written. That’s my internal dialogue justifying that goal taking so long.

The good news is I’m back on track there. Again, the rhythm mentioned before is allowing me to refocus some of my downtime as ‘me time’ and I’m getting back into a balanced life.

Flying In A Movie

Yeah, you read that right. I had the opportunity to portray a pilot in a movie! When I get more details on release date and other stuff I’ll let you know so you can check it out.

But you ask – “How can I be in a movie as a private pilot?” Well, simple. I’m was not and will not be paid for the role – or for any cost of my flying. That was all donated on my part. I did not take anyone flying with me (although movie magic may make it look different). And mainly I flew around and let them film from the ground.

So, that’s how you can fly for a movie and be a private pilot.

Short and sweet post to get back into things. I’ll be picking back up with my piloting posts soon and will start to add more of the things that I’m involved in to the blog as well. Keep checking back to see where the blog, my thoughts and life go in the next year!

Demystifying Class B Airspace

0

In a continuation of our deep dive into different airspace categories we come to Class B or “Bravo” airspace. To see the other types of airspace and get an overview of each check out  my airspace explained post.

The simplest definition of Class B airspace is the area surrounding the nation’s busiest airports. At the time of writing this article, there are 37 Class B’s in the United States. However, 12 of them do not allow operations by pilots with less than a private pilot certificate.

class b airspace

Identifying

From a side view the airspace often resembles an upside down 3 tiered wedding cake.

On VFR (visual flight rule) maps Class B is designated by a solid blue circle with two progressively smaller circles around the airport location.

class b airspace VFR

IFR maps show Class B as a light blue shaded circle.

class b airspace IFR

Each airport has different specifications on the shape and size of the Class B airspace. The general rule, however, for lateral dimensions are:

  • The outer limits will not exceed 30 nautical miles from the primary airport
  • The radius will usually be divided into 3 concentric circles with one at 10 nautical miles, one at 20 nautical miles and the outermost at 30 nautical miles from the center.
  • Each area may be divided even further due to other regulatory airspace or terrain.

The general rules for vertical limits are:

  • Extends from the surface to 10,000’ MSL
  • The floor of the area between the 10 nautical mile and 20 nautical mile ring is decided based on a 300 foot per nautical mile gradient.
  • The floor of the area between the 20 nautical mile and 30 nautical mile ring is normally between 5,000 and 6,000 feet above airport elevation.

Each Class B is also surrounded by a ‘Mode C Veil’ that is 30 NM from the primary airport. ANY plane inside this veil, regardless of penetrating Class B airspace is required to have a Mode C equipped (and functioning) transponder.

The Mode C veil is designated by a solid magenta line surrounding the airspace on a VFR chart. IFR charts use a thin blue line surrounding the shaded Class B.

Regulations

The second most restricted airspace in the country, Class B has a few additional operating rules than the lower classed airspaces. All operations in the airspace can be found in the
FAR section 91.131.

You must receive clearance to enter Class B airspace. This means that the controller must identify your aircraft by callsign/tail number and tell you you are “Cleared” to a location or to enter the airspace. Usually this will be followed by some set of restrictions. Usually altitude and route for separation and other issues that ATC has to contend with.

“Standby”, “hold” or any other term that is not specifically state “cleared” does not give you clearance to enter the Class B.

Additionally, regulations state that you may not take-off or land in Class B without a private pilot certificate. While some Class B will allow student pilots with the proper sign off, others explicitly do not.

VFR and IFR aircraft are provided sequencing and separation from other aircraft by ATC. This does not remove any responsibility of a pilot to ‘see and avoid’ while flying in the airspace.

Lastly, speed is also restricted to 250 knots inside the airspace and 200 knots below the airspace.

Weather Minimums

3 statute miles and clear of clouds is all that’s required for flying in Class B airspace. This gives ATC the most operating space when dealing with a mix of VFR and IFR pilots with all requiring ATC separation.

Exceptions

As with other airspace, prior authorization by ATC may amend any regulations set for by the FARs. “Unless otherwise authorized by ATC” is written all over the regulations as a way for ATC to make the best decisions to keep the airways safe.

Conclusion

Flying single pilot into and out of Class B can be very daunting, especially for new pilots. A good CFI can give you the training and experience you need to feel confident flying to some of the more populated airports in the country. For my money though, I’d rather fly to one of the smaller satellite airports.  I avoid some of the crazy at the larger airports that are more designed for commercial operations.

Have you flown in Class B airspace? Do you have any cool stories or photos to share? Leave them in the comments!

My First IFR Flight Plan

0
Photo Credit: http://avwxworkshops.com

Well, it happened. I can’t take it anymore!

No, not flying or even training. I am tired of flying solely in my local area. I mean really, how fun is this:

“What are we going to do today?”, “Let’s go to the south practice area, and then shoot an approach or two.”

B-o-r-i-n-g.

I didn’t get my pilot’s certificate to stay in my local area. I want to explore the country. Discover a new place to grab a bite to eat and go somewhere that you couldn’t easily reach in your car and be home by lunch. And I don’t want to have to go through the hassles of a TSA strip search just to do it.

THAT’S why I got my certificate.

So, now that we have the problem identified what’s the solution? A cross country! This way I can see a new airport, and knock out several training lessons all at once.

Where are we going

On this trip we are doing a 3 airport run. I’ll be starting out of my home airport of KABQ, navigating and flying out to Roswell (KROW) to shoot an approach or two and then go to Alamagordo (KALM). We will most likely stop in Alamagordo for some grub and then back to home base.

This trip will add two new airports to my logbook as well as give me some much needed cross country hours. The grub stop hasn’t been finalized yet. Though it would be nice to say hi to any aliens we may encounter in Roswell.

Initial Planning

My basic steps to plan a trip are almost the same as planning a VFR trip. You can check out my previous blog post to see how similar these steps are.

My first step in planning this trip was to get foreflight out and set it up for an IFR trek. Here are the two things I change from how I normally have it set up:

  1. Select the IFR (low route) maps
  2. Update altitude in the flight plan (FPL) tab

Next, I typed the very basic route into the search bar in the top right corner of the screen. KABQ KROW KALM KABQ. This gives me a general look at what the flight should look like.

A few things to note right off the bat is where the initial flight line goes. Is it along a published route? Can your plane fly the minimum altitudes along each route? Does your basic plan take you through airspace where you shouldn’t be flying, ie restricted airspace? Does the projected route take you over hazardous terrain?

IFR flight plan

As you can see from this above image I have some tweaking to do on this flight plan.

Adjusting the Route

This first thing I noticed is the intended route of flight took me through restricted terrain and was close to, but not exactly on published IFR routes. So, naturally, I adjusted the path to follow the published routes as best as possible.

Keeping to this line of thinking allows for a few securities

  1. The published routes have been approved for obstacle clearance within 4 NM of the centerline of the airway.
  2. The Minimum Enroute Altitude (MEA) of these routes is easily accomplished by the 172.
  3. It’s mountainous terrain. If I’m under the foggles, or it’s real IFR I want to be where I know there are no surprise terrain hazards.

So, follow the published airways when practicable and plan to go around the restricted areas. This is a good plan to get the following path which is what I will use for the remainder of my planning.

Calling Flight Service

Now that I have the initial plan, the next is to call flight service to get the outlook so I can have an idea on what the weather along the route is going to be. Now, I know you’re thinking that it’s an IFR plan so it shouldn’t matter. Well, I’m here to tell you that I take the ‘all available flight information’ to heart. An extra phone call to get the weather and have it on record is well worth my time.

Yes, it’s part of figuring out my personal minimums. Yes, part of it is understanding what the weather is doing and what I’m comfortable flying in. Also, part of it is habit.
Remember, I’m currently a VFR pilot and that’s what we do. Even when planning, we get the outlook briefing and adjust our numbers accordingly.

For this flight, outlook is ‘amazing VFR weather’. Should be a great flight.

Filling out the Flight Plan

Experienced users of foreflight will know that you can file the flight plan directly from foreflight. However, for this exercise and because I am still very new to the IFR stuff I will first fill out a paper flight plan. This is mainly for two reasons. First, it gets me in the habit of really understanding my flight plan. Secondly, I go through the motions of determining how long each leg will take and how much gas I need to complete each segment.

After only minor deliberation with my instructor we decided to separate the trip into two. The first leg to Roswell, the second to Alamagordo and then Back to Albuquerque. This was done manly because we didn’t want to write down all the changes they may have had for us along the entire route. Also, we were planning a stop in Roswell for lunch so it made sense to have two separate flight plans.

My instructor was questioning my paper method and asked if I planned on doing it that way for every flight. I told him my initial process is to do things by hand, and then use technology once I really understand the manual way of doing things. While he laughed he understood my reasoning.

Side note: my husband calls me the most technically inept technical person he’s ever met.  My first instinct to do things the non-technical way is a good testament to that. However, I’m truly of the mind that if you don’t understand something in a non-technical way, then technology will only make you understanding of it worse. It may hide some of your inability to fully understand it but that may eventually catch up to you.

Ready for the Flight

Now that the plan is done, mapped out on paper and approved by my instructor the only thing left is to fly the plan. I really took to heart the phrase ‘plan the flight, fly the plan’. It can only make my flying more successful.

Once we have our route listed in foreflight, we file the flight plan through foreflight, self brief and head out to the plane. Check out the next article to see how the flight went.

Building An A-10 Thunderbolt Model with My Son

0

A-10 Thunderbolt Model

In an effort to try and get my oldest son more interested in both school and eventually flying I have taken him with me a few times to the airport for meetings and flying. One time we were at one of the local FBOs and he saw a model airplane. He was immediately interested in it. Bingo! A new way in for encouragement and teaching.

After explaining to him that is was a model of an airplane he wanted to know if we could have a model of a plane too. Well, remembering from waaaay back in my younger days when I used to love putting together model cars and even a plane or two I was very excited to go find one for us to put together.

Finding the Perfect Model

My first instinct was to go to Wal-Mart but we didn’t find anything there. So, next stop…Hobby Lobby. If they didn’t have it then I would have been lost. Luckily for me, they had several war birds available for purchase. My oldest, and even my youngest were very excited and both picked out a plane that we could build together.

I’m not an expert at putting these things together so I was looking for something that was snap together and very easy on the scale of difficulty. Those were the ones that my boys ran to immediately.  Whew…

Some of these models even though they snap together still require a little glue to keep them together. After wandering around Hobby Lobby for a few minutes we found super glue and an Xacto knife (more because I think they are cool than the fact that we needed one) and made our way to the checkout.

Putting together the A-10 Thunderbolt

The instructions for this kit were very clear and incredibly easy to understand. Each part was clearly labelled with a number and the pictures made each step simple.

Now, knowing both me and my son, I made sure to only remove a piece from the rack when it was time for that piece to be used. Otherwise we would have had one giant mess of parts and a bird that would have been harder to assemble.

Here we go with adding the wings to the main fuselage.

Once we added the tail my son was getting excited. It was really looking like a real plane! He wanted to take a photo op break before we finished it.

A-10 Thunderbolt Model

And the completed plane with all the bombs attached.

Even with trying to take my thumb apart with an Xacto knife, this little endeavor only took us about 20 minutes.  The smiles and joy of having a plane that my son ‘built’ is worth every penny.

Check out the smiles!

About the A-10 Thunderbolt

The Thunderbolt entered service in 1975 and was designed specifically for close air support. It is the only plane that was built for close air support for the United States Air Force. This war bird was built around the 30mm GAU-8 Gatling gun but carried a significant weapons load came under its wings.

Credited with flying 8,100 missions during Desert Storm and even a few in Afghanistan the A-10 Thunderbolt was a key battlefield weapon system during Operation Iraqi Freedom. The single seat plane was equipped with titanium armor protecting the pilot. It could withstand significant damage allowing both pilot and plane to return safely.

Still in use today, the A-10 is potentially up for replacement by the F-35. However, many critics believe this would be a step back in both efficiency and cost. As of right now, the USAF has determined the A-10 will be in service until 2028 and possibly beyond.

I’ve never seen one of these in person, but if the model looks this good I can only imagine the real deal is even better. Let me know if you seen one of these up close and personal!

Flying Instruments – My Personal Saga

0

As many of my readers know I am working towards my Instrument rating. This is for several reasons. It makes me a better, safer pilot; Expands where and when I can fly; And lowers my insurance. All good reasons to pursue the rating.

Check me out under the foggles with my awesome instructor!

flying instruments

Flying with the foggles on is like nothing I’ve experienced in any other aspect of my life. Imagine, if you will, that while you drive your car you can’t see outside. You can only drive by looking at the dashboard. Now, the airplane’s dashboard has actual navigation gauges in it but for a newbie Instrument student it’s still a little unnerving. Hopefully that will wear off as I build time “under the hood” or even in actual clouds.

Starting my Instrument

I started the journey this time last year. However, life and one excuse after another got in the way. This time I am committed. I schedule the plane two to three weeks out and put it as a priority in my life. This will help with two things. Making sure I don’t miss the flight as well as keeping me focused on what I really want.

Speaking of what I want, what is it that I want? What do I want from flying? This is a question I have asked myself many times and I have come to an answer that I am happy with. I want to fly and progress in my flying ability so I can share the joy I have of flying.

I want to become an instructor and teach other people how to fly. I want to be able to hop in a plane and go see my family in all areas of the country because today is Friday and why not! And, let’s be honest, I want to fly because it’s a challenge and a fun skill to talk about with other people.

Instrument Rating Requirements

In order to understand where I’m headed with this rating, it helps to understand the requirements to attempt the checkride. They are as follows:

  • Have at least a Private Pilots license (check).
  • Speak, read and write English (check).
  • 50 hours cross country logged as PIC.
  • 40 hours of actual or simulated Instrument flying
  • 15 hrs of instrument flight training recieved
  • 3 hrs of training within 2 calendar months before exam date
  • Passed Instrument Written
  • 1 Cross country of 250 nautical miles (one leg) or more
    • Involve 3 airports
    • Instrument approach at each airport
    • 3 different kind of approaches (ex: ILS, VOR, GPS)

More flying and more prep for the written is what I need.

Prepping for the written

But I digress. Let’s get back to my instrument rating saga. I know that the instrument written is one of the most failed tests the FAA has. So, challenge 1: Pass the written the first time. I want to be one of the statistics on the positive side. How do I plan on achieving this? Well, I’ve got both the King and Sporty’s video series for IFR.  I will take both sets of practice tests until I pass with flying colors. I also have the Shepperd Air test. Again, once I feel I’m ready I will take that one and be sure to pass it as well. Then I will be ready for the written.

Practice makes Permanent

Now, on to the actual flying portion of the rating. I’m 3 flights in on my second reboot of my Instrument rating. I have several more flight hours to go before I’m even remotely ready to take the checkride. As an old high school teacher used to say, “Practice makes permanent. Perfect Practice makes Perfect”.

I’ve shot a few approaches and my first one was so horrible I resembled a dog chasing it’s tail all the way down the localizer and glide slope. My next approach was better.  Still weaving and bobbing to chase the needles but much smoother and not nearly as many massive swings in the needle. Improvement there.

Next up is trying a different approach (I’ve done the same one twice now) and trying an approach at a different airport. I also need to get in some cross country flights.

As I plan those I’ll post the planning and then the results of the flight so you can join me in my IFR training. My philosophy on many things is that it’s not important how fast you get something done, but how completely you understand it. Especially when it involves flying. I may not be on the fast track but I have nothing to prove and no desire to race to go fly for the airlines.

Do you have any stories from your Instrument training? What is one of the biggest hurdles you had to overcome to get your rating? Let me know in the comments.

Understanding Class A Airspace

0

Airspace was divided up for the safety of pilots and planes in 1993. Based on the type and amount of traffic, the FAA created the Classes we use today around the ICAO descriptions. Ranging from A-E and G each airspace has its own rules and regulations that a pilot must comply to.

The classes span the most restrictive, Class A, to the least restrictive, Class G. Let’s explore Class A a little further.

class a airspace

Identifying

Probably the easiest thing about Class A airspace is identifying it. Now, that’s not to say that it’s shown anywhere on any map though. The airspace is across all the continental US and Alaska, stretching out over the coastal waters by 12 nautical miles. It starts at 18,000 feet mean sea level (MSL) and goes up to and including Flight level (FL) 600 (or 60,000 feet MSL).

But wait, it’s not quite that simple. In the case of Class A airspace, and ONLY Class A airspace, the identifier isn’t based on local barometric pressure. Pilots fly in Class A using the “Standard Datum Plane”. We will get more into this a little later, but for the purposes of identifying Class A a pilot enters 29.92 in Hg into their Kollsman Window. This means that technically Class A does not start at 18,000 feet MSL exactly, but rather 18,000 feet MSL from a theoretical point near the surface that measures 29.92 inches of Mercury.

However, for any test that you would take from a Private Pilot’s perspective, the boundaries of Class A airspace is 18,000 feet MSL to FL600. An easy way to remember is “Class A – A means Above Everything”. Jets and larger, faster airplanes fly these altitudes to be above the weather. The airspace is the fast lane of the sky.

Why use the Standard Datum Plane?

To understand this, we need to first understand what a flight level is. Flight levels are altitudes set at standard pressure. For example: Flight level 230 (FL230) is 23,000 feet MSL based on the standard theoretical pressure of 29.92 in Hg.

Now, imagine this if you will. You are flying along on a cross country in your Cessna 172. You go from one location where the local pressure is 30.02 and you travel to your destination where the local pressure is 28.78. The scenario is, you don’t update your barometer. What happens?

Remember from one of my previous posts how to calculate pressure altitude? Pressure Altitude is (Standard Pressure – Local Pressure) x 1000 + Elevation.

So if you are flying at 3,000 feet on your altitude indicator and set 30.02 pressure you have 100 feet that you “add” by setting your pressure correctly. However, if you don’t change your pressure guage and fly into your destination at 28.78 you may find yourself 1,000 feet lower than you expected. My private instructor used to say “When flying high to low look out below”! He’d be so proud that I remembered that.

For this reason, Class A uses the standard pressure so ALL airplanes are on the same pressure and therefore no matter what the local pressure is all the planes in the air follow altitude together.

Regulations

Almost everything related to flying has regulations and airspace is no exception. But where do you go to find the regs? None other than the FAA. The FAR (federal aviation regulation) is the collection of all aviation regulations and can be found in Title 14 under the Code of Federal Regulations.

Airspace rules are under Part 91 of the FARs and Class A specifically under 91.135.

The few key points from the regs are:

  • “…each person operating an aircraft in Class A airspace must conduct that operation under instrument flight rules…”
  • Clearance is required prior to entering the airspace
  • Two-way radio is required on frequency assigned by ATC
  • Transponder is required
  • Required equipment for operating in Class A can be found in 91.215 and 91.225 after Jan 1, 2020.

Weather Minimums

Class A airspace is for IFR flight or Instrument Flight Rules. As such there are no weather minimums listed for this airspace. All flights are under ATC control and flying on Instruments.

Emergencies

What happens if you are flying in Class A and have a radio failure? Can you continue flight under VFR conditions?

If you read this blog post on AVWeb.com they provide a very convincing argument on why you may fly VFR in Class A airspace. The basic gist of the argument is if you lose communications with ATC while in Class A airspace you have two options. 1) Continue the flight as planned/expected. 2) Operate under VFR rules to the nearest safe airport and land under VFR rules.

If you continued your flight as planned/expected then ATC would be extra busy routing planes around you since you can’t communicate with them. While technically legal, depending on where you lost communications you may have some very upset controllers.

If, however, you fly your flight under VFR in Class A, while squaking 7600, and proceed to the nearest, safest airport you can land under VFR rules.  This accomplishes two things: 1) you can fix your plane and 2) You do your part to help keep the skies as safe as possible. You may also make friends with controllers who don’t have to reroute other planes to watch out for you.

How can this VFR in Class A be legal? By following this simple reg 91.185 IFR operations: Two-way communication failure. If you follow this reg IN ORDER of the provisions you get the following:

A) Unless authorized pilots with radio failure will follow the rules of this section

B) VFR (note, this section comes first, which would mean that you should follow it first). “If the failure occurs in VFR conditions, or if VFR conditions are encountered after the failure, each pilot shall continue the flight under VFR and land as soon as practicable”.

C) IFR. This is where you get the instructions to follow what you were given/filed etc to complete your flight.

If you are going to fly in any airspace you should know what the rules and regs say should things go wrong. Be proactive in your quest for knowledge on when an exception to the rules applies.

Exceptions

As with all rules there are a few exceptions to the rules. The FAA has given themselves some space here by always adding the statement “Unless authorized by ATC” in almost all the regs. This means that there are times where ATC can authorize a diversion from the regs for anyone, for any reason. However, don’t expect that just because you ask for it.

Another exception is for gliders and sail planes. ATC will issue them a special clearance to fly in Class A if they are flying the mountains and more likely to bust Class A airspace. There are also some high-altitude skydiving operations that may pass through Class A. For these exceptions you must submit your request, in writing, to the appropriate controlling ATC facility no less than 4 days in advance.

Conclusion

Class A airspace is simple if you understand the very basic rules, clearance to enter, IFR operations unless authorized, and starting at 18,000 feet MSL. All other changes are special cases that unless specifically stated on an FAA test will not factor in.

For more information on other airspaces Check out my overview of Airspace.

What have you experienced in Class A airspace? Have you been a pilot of a plane that has experienced a deviation to the standard airspace rules? Let me know in the comments.

January Goal Checkup

0

goal checkup

It’s difficult to know if you are on track to meet your goals if you don’t regularly check to make sure you are following your plan.

This quick post is to keep myself honest about where I am, what I need to focus on and any improvements to my current plan that I need to make. Here is a quick reminder of what I said this year is going to look like for me:

2017 Goals

  • Double total time logged for a total of 243.4 by Dec 31, 2017.
  • Achieve Instrument Rating by June 2017
  • Participate in the Women of Aviation Week (March 2017)
  • Fly to Dallas to visit family by May 2017
  • Fly to Denver to say I did by August 2017
  • Fly to Phoenix to round out the surrounding states by Dec 2017
  • Compete in the Air Race Classic (either as PIC or Co-Pilot)
  • Use the GoPro to start logging flights. Both for record and honest review.
  • Publish a blog post at least once a week
  • Attend 12 flight related events averaging one per month
  • Introduce 15 new people to the joy of flying

Alright, let’s take each of these in stride.

On Track Goals

Doubling total time logged… So, 121.7 hours this year.  That’s aggressive of me, but let’s see where I sit right now: January: 3.4 hours logged. Hmmm, 118.3 hours to go to meet this goal. Still doable. Aggressive, but doable.

I’ve already started a video ground school for my Instrument and have 2 days a week blocked in my calendar for flight time specifically for the Instrument rating. Seem to be on track there.

Women of Aviation Week is in March and blocked on my calendar. I also have both Oshkosh and Sun n Fun temporarily penciled in. Dallas, Denver and Phoenix are still possible at this point.

Lastly for on track, 5 blog posts in January! This is a great start to the year. This number will hopefully go up as I have been working on improving my work space at home. Come Feb 1 my home office will be much more conducive to working/studying and that should significantly increase my production.

Not on track

Realistically I don’t see myself participating in the Air Race classic this year so I will work on adjusting this goal in the coming months.  And I’m behind on my 12 aviation related events already as I did not go to one in January. Also, I’ve not had anyone new in my plane in January. This one will get met during women of aviation week, but I think I want to make this goal relevant outside that one week.

Let’s talk the go pro for a minute. I tried my new set up once and it didn’t even last the Taxi so I guess I need to work more with the apparatus before trying it in the plane.

Conclusion

So far so good. I think checking up on this every month will be too much as some months won’t change the numbers. So, once a quarter should be good for this type of accountability. Keeping it fresh and still achievable/adjustable.

Have you checked in with your goals this year? It’s best to set the course early and check in early so you have time to adjust as the year goes on. The older I get the faster the years move by.

Airspace Classes Explained

0

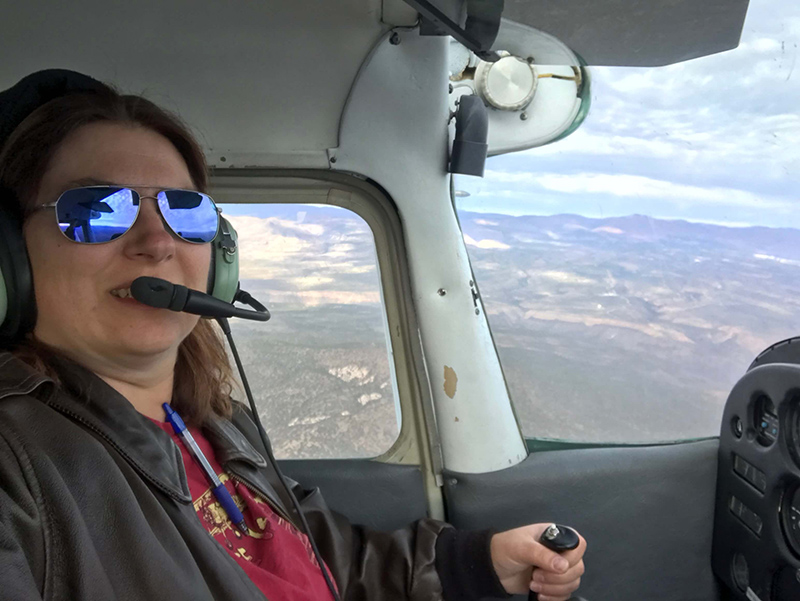
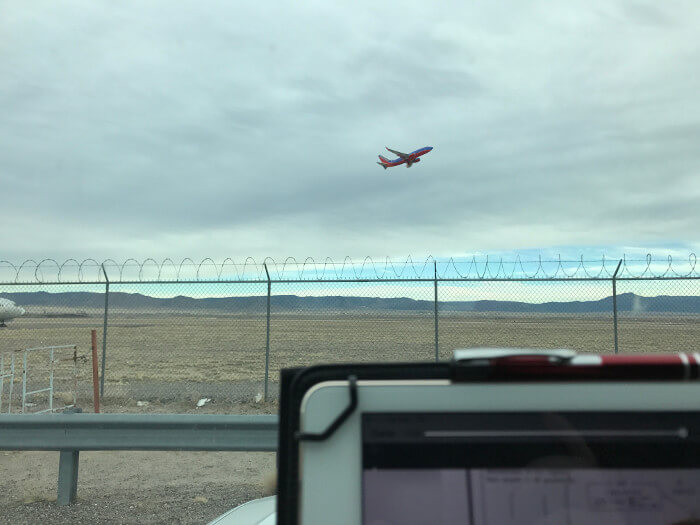
In the United States, which is where I do all my flying, airspace classes are there to assist with the growing number of planes in the sky. Since there is no established roadways in the sky there needs to be some way to ensure that pilots don’t run into each other.

As you may have guessed there are some areas of the country that have more air traffic than others. For example, the Dallas/Ft. Worth area has waaaaay more traffic than say the rural areas of New Mexico. So, how do we determine what rules apply to which areas? How can we tell what the airspace is above our heads? What about when we are flying, how do we know what type of airspace we are operating in?

The answers to these questions are in Airspace Classes.

airspace classes

What is an Airspace Class?

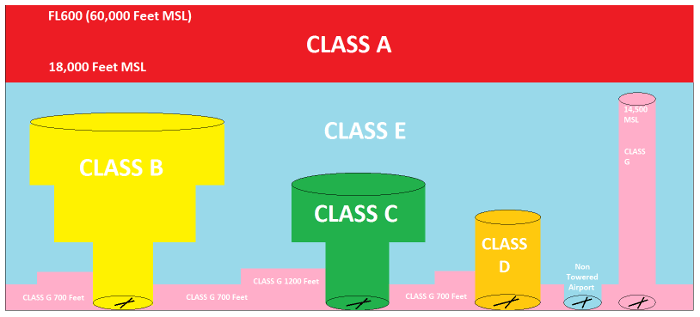
Airspace classes are divided into three main categories, Controlled, “Uncontrolled” and Special Use/Other. The uncontrolled airspace does not mean that anything goes, only that an air traffic controller is not monitoring and actively routing planes through those areas. Controlled space is the opposite. There is an air traffic controller monitoring that airspace and providing services to IFR flights and VFR when their work load permits.

The United States uses the ICAO definitions of airspace. These are as follows:

  • Controlled Airspace:
    • Class A
    • Class B
    • Class C
    • Class D
    • Class E
  • Uncontrolled Airspace:
    • Class G
  • Special Use Airspace:
    • Restricted Airspace
    • Prohibited Airspace
    • Military Operating Areas
    • Air Defense Identification Zone
  • Other Airspace:
    • Temporary Flight Restrictions
    • Special Flight Rules Areas

Any point in the air can only have 1 classification of airspace. For example, you cannot be flying in both Class B and Class D airspace. Based on your physical location over the ground as well as your altitude you will only be in a single type of airspace.

You may have noticed that there is no Class F airspace listed. This airspace is not used in the US. There are other places around the world that use this designation however, so it still exists as a class.

Lastly, what’s up with the special use airspace and the “other” airspace? Well, to put it plainly, those are areas where different rules apply from the ‘normal’ classification of A-G airspace.

Airspace Classes

Here is the down and dirty for each of the classes listed above. I will be writing a post on each class in the coming weeks and linking back here. So, keep coming back and check out the more detailed information.

Class A

Our first airspace is Class A. This is probably the easiest of all the airspace. It is above the entire United States starting at 18,000 feet MSL (mean sea level) and going up to and including 60,000 feet MSL. For ease of communication the altitudes flown in class A are usually defined by flight levels. A flight level is shown as FL600 or “Flight Level 600”. This means 60,000 feet. The first two numbers in a flight level are the “thousands” and the third number is the hundreds designation.

Unique to Class A, any plane flying in class A must use the standard pressure setting of 29.92″ Hg in their Kollsman Window. Due to this fact and not setting the actual pressure of the local area, the altitude for class A technically varies depending on the barometric pressure.

Class A airspace is IFR or Instrument Flight Rules only. It is controlled entirely by Air Traffic Control. You must receive clearance to enter class A airspace. This means you must hear the words “Cleared to Enter Class B” or along those lines before you may cross into the airspace.

Due to the nature of class A being over the entire United States it is NOT shown on any VFR charts.

For a more in depth look at Class A airspace, check out my blog post going into great detail.

Class B

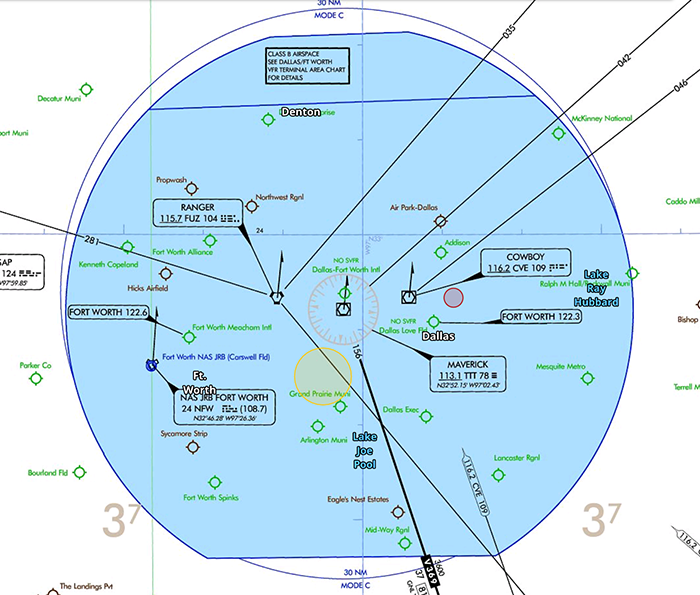
Think of class B airspace as “Busy”. This airspace is for areas of significant traffic and increased IFR operations. Due to the nature of how planes fly in and out of an airport the airspace looks like an upside-down wedding cake. The smallest section of class B being around the airport, the next largest layer is above that extending out a few nautical miles and the last layer above that. The increased IFR operations requires ATC to have significant control over the planes and where they are.

Class B airspace usually starts at the surface and goes up to 10,000 feet MSL. Each class B is tailored to the specific area so may have some differences and nuances to them.

A pilot must receive ATC clearance to enter the class B. The plane also must have two-way radio communications and a Mode C transponder.

Each class B has a Mode C veil that stretches out 30 Nautical Miles from the center of the class B. ALL aircraft that crosses that veil must have a functioning Mode C transponder, regardless of if they are entering the class B airspace or flying under it.

Due to the nature of the operations and sheer volume of planes in class B airspace it has the strictest rules of any other airspace.

Looking for more information about Class B? Check out my blog post here that goes into more detail.

Class C

Class C airspace is similar to Class B with less stringent regulations. The shape of the airspace is usually two layers with the bottom layer being the smallest in diameter. The height of class C generally goes to 4,000 feet Above ground level (AGL). The actual top is listed in MSL on a chart. Much the same as class B airspace, each Class C is tailored to each airport individually.

Class C requires two-way radio communications and Mode C transponder for entry into the airspace. You must establish communications with ATC before entering Class C airspace but you do NOT need clearance to enter.

What does establish communications mean? It means that you have talked to the controller and they have acknowledged you by your tail number.

For example:

Pilot: "Approach, Cessna N12345"
Approach: "Cessna N12345, standby"

The above is an example of established communications.

Pilot: "Approach, Cessna N12345"
Approach: "Calling aircraft, standby"

The above is NOT established communications. If you hear this you are NOT cleared to enter the class C airspace. The controller has to call you by your tail number.

Class D

Airspace created for airports that have active control towers but may not see a significant amount of IFR traffic. Class D airports are not usually where passenger airlines come in and out of. Often these airports are for General Aviation, flight schools and other non commercial flights.

The general class D airspace is a single cylindrical layer. Averaging 4 Nautical miles from the center and usually up to 2,500 feet AGL. Some class D’s have radar, but most are the old school way of binoculars and visually spotting traffic.

Two-way communication is required to enter Class D, but unlike all other airspace so far, Mode C transponders are NOT required.

This airspace reverts to either Class E or Class G when the tower is not in operation. You can find which specific airspace it becomes by checking the Airport Facilities Directory for the requested airport.

Class E

Class E is all remaining controlled airspace that is NOT Class A, B, C, D or G. This is the airspace over most of the continental US. It is the only controlled airspace where radios are not required. There are also no pilot requirements, meaning you can be a student pilot and fly in class E airspace without any specific endorsements from your instructor other than your ability to solo.

Technically class E airspace exists from either 700 feet AGL or 1200 feet AGL and goes up to and including 17,999 feet. Also, the airspace above Class A is also registered as Class E. However, most commercial planes don’t fly above 60,000 feet and the few planes that do belong to the government.

This is the least restrictive controlled airspace. If you are flying VFR you do not need to talk to anyone the entire time you are in this space. If you are flying IFR you do need clearance and to remain in contact with ATC.

Class G

This is the first, and only uncontrolled airspace in the United States. Being uncontrolled, there are very few limitations for flying in this airspace class. This is the space underneath all other listed airspaces. It is between 700 feet AGL and 1200 feet AGL.

There are rare occasions where Class G extends above 1200 feet AGL. You may see it in mountainous areas. Sometimes you find it in sparsely populated areas, like some areas in Montana. Many airports are surrounded by class G airspace close to the ground.

There are no requirements for communication and no special requirements for equipment in Class G airspace. Most pilots enter class G as they are transitioning from other airspace classes either during takeoff and landing.

Special Use

There are many different types of special use airspace. These airspace classes do not have correlating ICAO designations but they are found throughout the US.
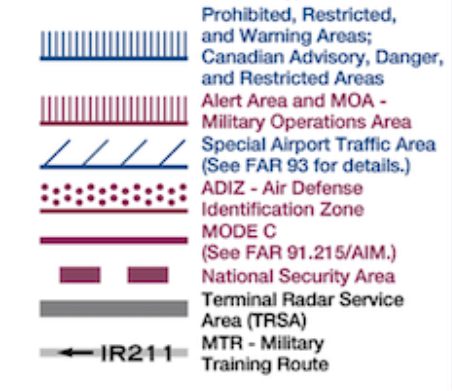
Restricted Airspace

This is airspace where normal plane operation is not authorized. You must first receive clearance from the controlling authority of the airspace. Entry into this type of airspace without proper clearance may result in an interception and forced landing.

Prohibited Airspace

While restricted airspace requires clearance, prohibited airspace is just that. Prohibited. No aircraft operations may happen in this area. Entrance into these areas are certain to be met with interception or possibly even being shot down depending on the reason for the prohibited status.

Military Operation Areas (MOAs)

These are areas where the military may be conducting training. Such as hazardous maneuvers and flight above the normal speed limit for the altitude. This training could be detrimental to other unsuspecting aircraft. The MOAs will have operating times and altitudes where the operation is active. Check all available NOTAMS to determine if the MOA is active.

Civilian operation in a MOA is authorized and no clearance is required to enter a MOA. However, it is the duty of all pilots to be on high alert as there may be high speed military operations that make plane spotting difficult.

Air Defense Identification Zone (ADIZ)

The ADIZ airspace is an area surrounding the coastal United States and Canada. Entrance into this airspace requires authorization. This is the first barrier of entry for the airspace of the United States from foreign countries.

Unauthorized flight into this area may result in your aircraft being treated as hostile enemy aircraft. I would expect either interception or worse.

Other Airspace

Lastly there are two types of airspace that really don’t meet any of the above mentioned definitions. They are TFRs and the SFRA of Washington DC.

Temporary Flight Restrictions (TFR)

There are many reasons that the FAA may choose to change the airspace around a temporary point. These restrictions have individual rules that apply to them and they are listed in the NOTAMS about the TFR.

Temporary flight restrictions are just that, a temporary set time where normal aircraft operations are restricted or prohibited. These pop up in airspace for several reasons. Some of the more common reasons are:

  • Sports Arenas during Sporting Events
  • Presidential Movement
  • Wildfires
  • Rocket launching

This is by no means an exhaustive list. TFRs are active for a variety of reasons. Each one has a specific starting time, radius and location that can all be found in the Notices to Airmen.

Special Flight Rules Area (SFRA)

Some areas are even more out of the norm to keep a standard airspace class or even a special use class. These areas are known as special flight rules areas. Washington DC is one location that has a very extensive SFRA. Due to national security there are many restrictions that apply to flights around our nation’s capital.

Other areas such as Los Angeles has an SFRA as well as the Grand Canyon. These SFRAs all have individual rules regarding the type of flying that can be done in their areas.

The DC SFRA requires special training and an online test showing competency regarding the SFRA before you may enter the area. Other SFRAs are modifications to the designated airspace rules.

Testing Your Knowledge

Now that you know a little more about each airspace class let’s play a little game my private pilot instructor use to call “What airspace is above my head?”

First Spot

Let’s start out easy with this one.

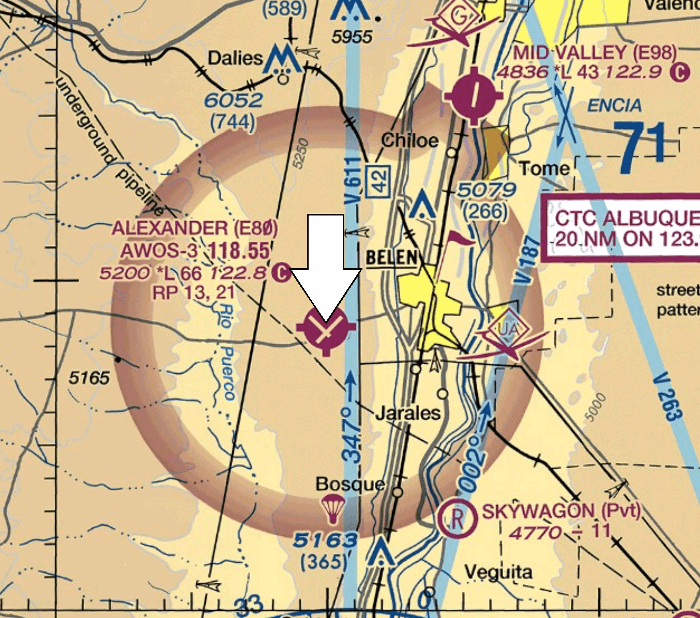
How do you start looking at something like this? Well, I start at the point and work my way out.

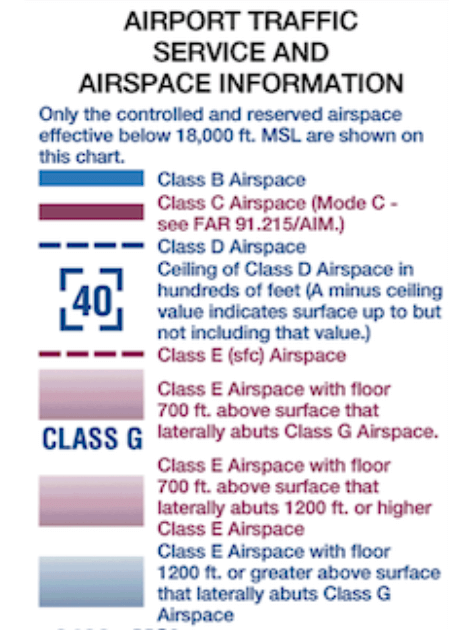
Step 1: Does the point (airport in this case) have any immediately surrounding data that shows the airspace to the surface (usually dashed lines or something showing SFC)? Not on this one.

Step 2: Expand you search out to see if there is any additional airspace information. YES! On this point we have a CLASS E airspace with floor 700ft above the surface notation.

Step 3: Determine your Airspace from the surface.

  1. 0 ft AGL – 699 ft AGL = CLASS G
  2. 700 ft AGL – 17,999 ft MSL = CLASS E
  3. 18,000 ft MSL – 60,000 ft MSL = CLASS A
  4. 60,001+ ft = CLASS E

How did you do on that one? Want to try another one?
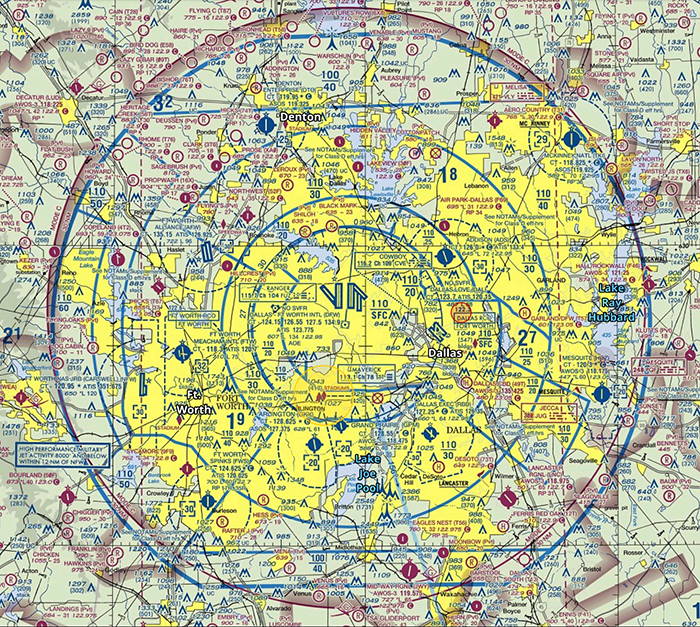
Second Spot

Now it’s time to turn on the pressure.

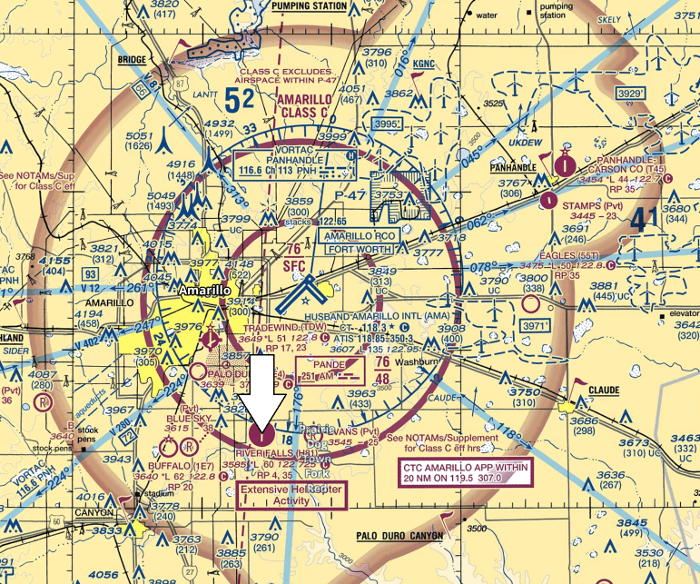
Same steps as before, start at the point and work your way out to determine the airspace.

Step 1: Check the immediate area to see if you have an airspace that goes to the surface. Not on this one.

Step 2: Go a little farther out and see what airspace may be around your point. We have a Class C shelf above our head. We are in the 76/48 shelf. Meaning the bottom of that shelf is at 4,800 feet MSL and the top of the shelf is at 7,600 feet MSL.

Step 3: Go out farther and see if there is any additional airspace. We find a Class E from 700 feet AGL to 1,200 feet AGL.

Step 4: Put it all together.

  1. 0 ft – 699 ft AGL = Class G
  2. 700 ft AGL (4,285 MSL) – 4,799 ft MSL = Class E
  3. 4,800 ft MSL – 7,600 ft MSL = Class C
  4. 7,601 ft MSL – 17,999 ft MSL = Class E
  5. 18,000 ft MSL – 60,000 ft MS = Class A
  6. 60,001+ ft MSL = Class E

How did you do? Did you catch all the airspace class changes? Altitude is very important when you are going through areas such as this. This type of exercise is good to do every so often to make sure you are still sharp with your airspaces.

Your turn!

Pick a spot on your aeronautical charts and see if you can determine what the airspace is all the way up to FL600. The more you do this the better you become at recognizing what type of airspace you may be in based on where you are in the air. This makes you a better, safer, more informed pilot.

Conclusion

To the non-pilot, the sky looks like a wide open field where you can go where ever you want. New pilots see a mess of airspace classes that you need to remember or you may get yourself in hot water. For those of us who have been flying for a while, it’s a nice reminder of the basics and maybe you learned a thing or two.

Do you have a better way to understand each airspace? Have you tried the what airspace is above you exercise before? Let me know your thoughts in the comments.

How Far is A Nautical Mile?

0

If you are in aviation or boating you have heard the terms nautical mile and statute miles more than you probably care to count. But how far is each mile and why are they different?

Statute Mile

Lets start out with a statute mile since most of the world’s English speaking population that doesn’t fly or sail uses this measurement without even knowing it.

1 Statute Mile is the distance of 5280 feet. This decree was created by Queen Elizabeth I in 1593. This standardization of a mile based on feet was to help determine distance while walking on land.

Waaaay back when distance and measuring was not so regulated the people of the world were still looking for a way to communicate size and distance. The ‘foot’ measurement was the size of a full grown man’s foot. However, some data suggests that the actual size referenced was the shoe size rather than the actual foot size.

Fast forward a few decades and centuries and the varying sizes of men’s feet meant that distances and measurements were not consistent. That’s when the British Monarch fixed that problem and standardized units of measure.

Now, how can you determine a foot in the air and on water?

Nautical Mile

Enter the nautical mile.

I don’t know about you, but the last time I tried to walk on water or walk in the air it didn’t go so well. And before you say, but you could measure your distance over the land, tell me how far over land a boat travels?

So, what was the answer? Math. The universal language of the world.

In basic terms a nautical mile is defined as 1 minute of 1 degree of arc. Wait…but where’s the math?

Nautical Mile = Circumference of the earth (at 45* latitude) / 360* / 60.

Ok smarty pants, where did that come from you ask?

Mathing the Nautical Mile

how far is a nautical mile

In 1617 Dutch scientist Snell determined the circumference of the equator to be 24,630 Roman miles (24,024 statute miles). British mathematician Edmund Gunter further refined that by using a circle with same measurements of Snell using the 48* latitude as a guide.

The known math of a circle being 360* is the start of our calculations. 131,334,912.3 feet was the circumference at the 48* latitude using Snell’s calculations. Divide that by 360* and you get 364,819.20 feet between each degree of latitude. From there divide it again by 60 to get 1 minute of distance and you come to 6080.32 feet. Thus, Gunter calculated a nautical mile to be 6,080 feet.

Different mathematicians from around the world used the 45* latitude to make their calculations and came up with 6,076 feet for a nautical mile.

As always, the need for standardization across the world is key in keeping communications consistent. So, in 1929 the international nautical mile was determined to be 6,076 feet with the United States adopting that standardization in 1954.

Statute vs Nautical Mile

Now that we have the official standards of each mile what is the difference of distance between them?

  • 1 Statute Mile = 5280 feet
  • 1 Nautical Mile = 6076 feet

6076 / 5280 = 1.15 statute miles per 1 nautical mile.

Calculating Speed of Each Mile

Now that we know the distance of both miles we can understand how to calculate speed. Which is distance over a period of time.

Statute Miles

We recognize the speed of miles per hour when it relates to a statute mile. That’s the measurement we use in cars. MPH or miles per hour. 1 MPH is the speed you are going when you take 1 hour to cover the distance of 1 mile.

To put that in perspective, the average human walks about 3.1 MPH. Meaning in one hour of continuous walking the average person will cover 3.1 statute miles.

Nautical Miles

The unit of measure for speed of a nautical mile is called a Knot. 1 Knot is the speed you are going when you take 1 hour to cover the distance of 1 nautical mile.

This is from the old days of sailing. A rope tied to a plank of wood was thrown over the stern of the ship. Then an hour glass with 30 seconds of sand was used to time how many knots in the rope went overboard. Again, because of math, the distance between each knot on these ropes was 47 feet 3 inches apart.

Let’s put this in perspective, the average human walks about 2.69 Knots. In 1 hour of continuous walking you would cover approximately 2.69 nautical miles.

Conclusion

The standardization of measurements has made communication and navigation significantly easier over time. Can you imagine trying to give someone directions to your house and one person used the statute mile and another used the nautical mile? You wouldn’t get very far very fast and certainly wouldn’t end up in the destination you were trying to get to if you couldn’t determine how far a nautical mile is.

The statute mile was created based on an arbitrary unit of measure. One day the Queen decided a mile would be so many feet. This is why the metric system makes more sense over the imperial system. At least while trying to determine the measurement of a nautical mile mathematicians tried to make use of some standardization that had practical applications.

Now if only aviation would figure out if they only want to use nautical miles and knots or statute miles and MPH. Think of your airspeed indicator, wind speeds and distances given for certain things. Sometimes the are in MPH, sometimes Knots, sometimes SM (statute miles) and sometimes NM (nautical miles).

What are your thoughts on the standardization of units of measure? Do you think that the FAA and ICAO should stick to one or are you ok bouncing back and forth between both units?

Studying with a View

0

I took some time today to get out of my house. While I enjoy being able to do what I want when I want from home it can get a little boring.

So, today I decided to take my iPad and virtual classes and give myself an inspiring view.

studying with a view

It was colder outside than I normally want it to be if I’m going to stay in the elements so I sat in my car and got some work done. The picture from my phone has the day looking a little gloomier than it actually was, however, the winds were incredible. 260* at 12 gusting to 25.

My location was rewarded every so often with a takeoff.

Crosswind Analysis

I am a perpetual student, so I took the time to evaluate what the crosswind component was for the runways at KABQ. You can read about how to do this in more depth with my previous post on the Crosswind Component.

In order to do this you need the wind direction and speed and the runways directions.

I was sitting along runway 03-21 so we will use that runway for our calculations. 21 is the closest to the wind direction, and the active runway. With a 50* difference between the wind direction and the runway, crosswind is very important to prepare for.

50* difference and 12 gusting to 22 creates a crosswind of approximately 10 – 18 Knot crosswind. I’m glad I wasn’t flying as that is more than my current personal minimum is for crosswind.

What class are you taking?

For those of you who are more interested in what’s on my iPad, I am taking one of the King courses.

I am actively working on my Instrument rating. The first steps in that are to knock out some ground school courses. I have both the King and Sporty’s instrument courses. When I’m done going through both of them (because I’m crazy like that) and take and pass the written I’ll be writing a review blog post.

Score one for keeping on track with my goals for the year!

Have you found a good view to take some aviation classes? Show me your study view.

Pin It on Pinterest